
 Rod piezos can give you great improvements in overall tone and sound on your instrument builds, compared to a standard disc piezo. However, the standard rod piezo is made for a 6-string guitar, and at 2 ¾” in length, is often longer than a cigar box guitar builder needs or wants for embedding in a bridge. Fortunately, it is a fairly simple process to cut the rod piezos to a shorter length, for 3 or 4-string setups. However, it is important to cut it them in a certain way so you don’t ruin them, which is what this article will show you.
You can get Rod & Disk Piezos and all sorts of other great guitar and cigar box guitar gear over at our C. B. Gitty Crafter Supply Web Store. Browse on over and check it out!
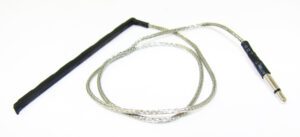
 First, a little bit about the anatomy of a rod piezo. Unlike disk piezos which are used in all sorts of different devices, rod piezos are designed specifically for use as acoustic instrument pickups. Instead of a round disk, they tend to be long and thin – those made for a standard 6-string acoustic guitar tend to be about 2 ¾” long by about 1/8” wide by about 3/16” high. The main body of the rod is conductive metal, and onto this metal is glued small ceramic wafer rectangles, as shown in the photo. Across the top of these wafers runs a thin strip of conductive metal, usually copper. This strip, and the conductive base under the ceramic wafers, are both connected to the leads
 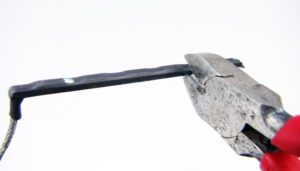 that run from the piezo rod (generally a single wire with an insulated positive lead inside a wired mesh ground). Note that we have removed the black shrink wrap casing in the photos for clarity, but you can still tell where the wafers are when the shrink tubing is on by looking for the bumps. You do not need to remove the shrink tubing to cut the rod piezo – it is actually highly recommended that you leave it on.
By design, the ceramic wafers on the top of the piezo rod correspond to the strings on the guitar. So if you look closely at one, you’ll see six raised “bumps” and five lower “divets”. So when looking to shorten the rod piezo for fewer strings, 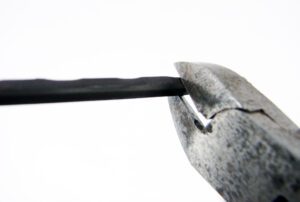 you need to count over from the lead-side of the rod piezo the number of bumps that corresponds to the number of strings on your instrument. For a 3-string, you’ll want three bumps, for a 5-string five, etc. When you cut the rod piezo, you’ll be cutting it in the lower “divet” just PAST the last “bump” you want to keep. Remember, you want to end up with one “bump” on the rod piezo for each string on your instrument.
Before getting into the cutting, you should be aware that it is technically possible to ruin your rod piezo, even following these steps. I’ve never had one ruined myself, but others have told me that after they cut it they couldn’t get any sound at all out of it. I don’t know what went wrong, or whether it could have been fixed, but just be aware that there is an element of risk to it.
 For the actual cutting, use a sharp pair of side-cutters or snips. Don’t use something old and dull – you want a clean, quick snip, not some mashed and mangled thing. The more you mash about with the cut, the greater the chance of creating a short. The photos to the right shows a cut all lined up to create a rod piezo for a 4-string instrument. Notice how the pliers are lined up in the “divet” just past the fourth “bump”?
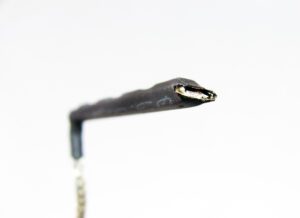
Make sure to cut “top to bottom” through the rod, not side-to-side. Make a single, quick, clean cut straight through the rod. The end result should look something like what is shown in the next photo. You shouldn’t need to worry about covering the exposed ends, unless you are embedding the rod piezo in some sort of metal bridge where the exposed conductive bits would touch something metal. In that case, using some liquid electrical tape or other non-conductive sealer couldn’t hurt.
One more reminder that you can get Rod & Disk Piezos and all sorts of other great guitar and cigar box guitar gear over at our C. B. Gitty Crafter Supply Web Store. Browse on over and check it out!
 You should now have a shortened, customized rod piezo that will work great in your build, and which should give a fuller, better-sounding tonal range than a single disk piezo would. We hope this quick how-to article has been useful for you, and wish you the best of luck in your instrument-building endeavors!
I have an Eldagas 6 string. The nut/bridge where the pickup goes is shorter then most guitars because of adjustable screws on each side to raise or lower. So the pickup only needs to be shorten a very small amount. Maybe an 8th of an inch. can this be done on the oposite side of the wire that leads off.
You can wire a rod piezo straight to a jack with good results. Adding a pre-amp does make for more of a “pro-level” instrument though, and will be much more appealing to a performing musician.
Is there any other electronics needs when using a rod piezo (i.e. Preamp)?
That is an advanced topic, and one we don’t have a specific how-to for it. In general though you would need a 3-way selector switch or blend pot, that allows the two pickups to be chosen between/blended together. There are wiring diagrams available for this on other sites.
How would you set up a CBG’s with both rod and magnetic pickups .?
I would like to be able to blend sounds from both. I have a mini hum in the neck and a rod under the bridge. Thanks for any advise.
Scott Morrison
Scootrhut@gmail.com
I have piezo rods on home-brewed fiddle (made from a 2×4) and viola (solid cherry body) – both 4 strings. This is just what I needed. Many Thanks!
I was hopplng for info or sort of diagram at the male end of the Rod Piezo. Thanks for your help .