
This article covers some of the key basic methods for successful soldering, whether on your Cigar Box Guitar or other electronics project. Filled with photos and good advice that comes from years of experience, this short tutorial will have you successfully soldering in no time.
Topics covered include: the importance of tinning your iron and wires, what good solder joints look like, soldering to a tone/volume pot, soldering to a piezo, and wire aesthetics. If you have been uncertain about your soldering skills, this tutorial is a great place to start improving.
| For great deals on potentiometers, piezos, jacks, hook-up wire and other CBG parts, be sure to check out our C. B. Gitty Crafter Supply Web Store! |
|
SOLDERING TIPS
|
|
| Firstly some tips & myths. | |
|
Tinning the iron– Melt a little solder onto the tip of the soldering-iron. This helps the transfer of heat from the tip of the iron to the joint being soldered. Quicker transfer of heat means less time being heated – (this is a good thing). Do this after plugging in your iron and occasionally during soldering after cleaning the tip. Tinning a wire – Melt a small amount of solder onto the stripped & twisted end of your wire. This makes your wire easier to insert into the holes of pots/jacks/etc. It also helps heat-transfer during the soldering process. Lead solder & lead fumes – Lead boils at around 3000°F, Most soldering takes place well below 750°F. You are not breathing lead fumes. The smoke and fumes you’ll get are from the flux. These fumes are still dangerous and soldering should always be carried out in a ventilated area. Always wash your hands after using lead solder, it may not be in your lungs but it will be on your fingers. Lead-free solder – Lead-free solder does not flow as well as lead solder, try to get lead solder if you can. An important note: the flux-fumes from lead-free solder can actually be worse than the fumes from lead solder. Tip cleaning – The tip of your soldering-iron should be cleaned after the initial tinning and before soldering each joint. A lot of irons are supplied with a small sponge, which you moisten. Wiping your iron on a wet sponge will clean it, but will also cool it, which you don’t really want. A better tip-cleaner can be easily and cheaply made: go to a grocery or dollar store, and pick up a pack of the copper pan-scrubbers. Hot-glue one to the inside of a large jar-lid. To clean the tip, simply jam it into the scrubber, a wiggle, and you’re done. Mechanical vs. Electrical – Your solder joints need to be both physically strong, as well as electrically conductive. A strong joint is no good if it causes a short, and a weak joint is bound to fail eventually. The way to achieve consistently good results when soldering is through good methods, especially when it comes to good preparation of your wires before soldering. |
|
| PRACTICE MAKES PERFECT | |
|
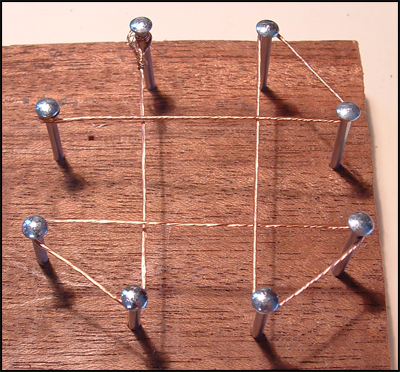
As with most things in life, the key to consistent success is practice. This is especially true when it comes to soldering. The more you do it, the easier it will seem – especially if you practice good methods from the beginning. So let’s start with a way that you can practice soldering, and help teach yourself how to do it right. This method was first outlined (to the best of our knowledge) by Stephen over at buildyourownclone.com, and it’s a great method, so we present it here. Start by finding a piece of softwood, such as pine, and put in eight snall nails, as shown in the example photo. Then take a piece of wire that you’ve stripped all of the insulation from, and wrap it around the nails as shown in the photo, to form a sort of grid. |
|
 |
|
|
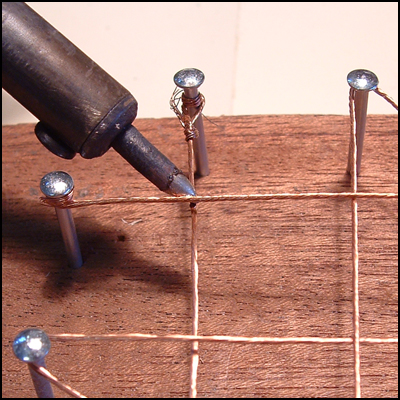
As always, start by making sure the tip of your soldering iron is properly tinned. Then place the tip where the wires cross, in order to heat up the portion of the wires that you will solder.
|
|
 |
|
|
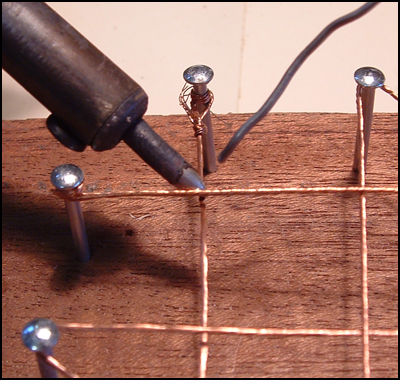
One of the keys to good soldering is to not expose elements to too much heat from the soldering iron. You want enough heat to let the solder properly flow into the intended area, but not so much that anything melts or gets “cooked”. The entire process of heating and soldering the wires in this exercise should only take about a second.
|
|
 |
|
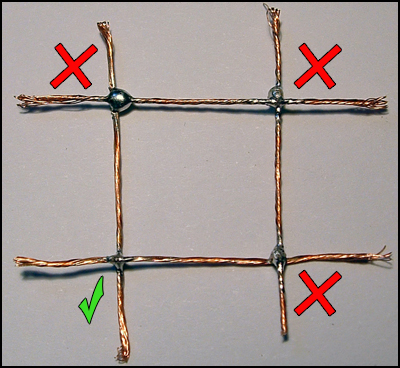
Exercise Results: the Good, the Bad and the Ugly..
Remember: your solder joints should always be shiny and contain just enough solder to hold the parts together. |
|
 |
|
|
|
| SOLDERING WIRES TO A VOLUME/TONE POT | |
|
Bare wires are not your friend when you are soldering. They lead to shorts and other problems. Always make sure that your wire leads are kept short and tidy.
|
|
|
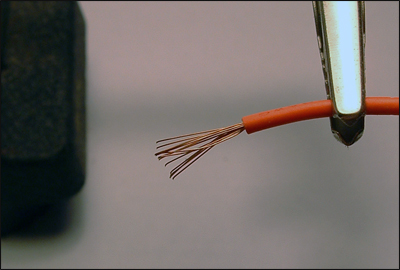
Start by stripping about 1/4″ – 3/8″ of the insulation from the end of your wire.
|
|
 |
|
|
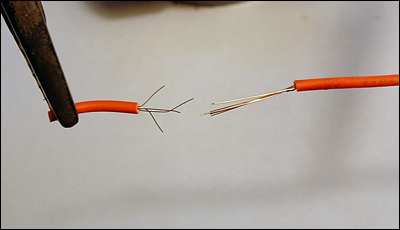
If you see any loose strands of wire in the piece you just stripped, cut off the end and do it again. If the strands are broken, your resulting solder joint will be weaker.
|
|
 |
|
|
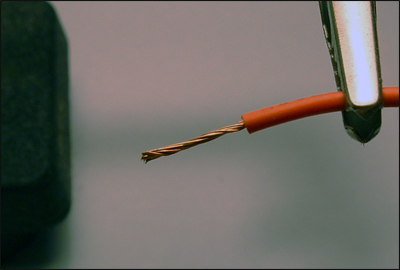
Once you’ve stripped the insulation, twist the strands of wire together.
|
|
  |
|
|
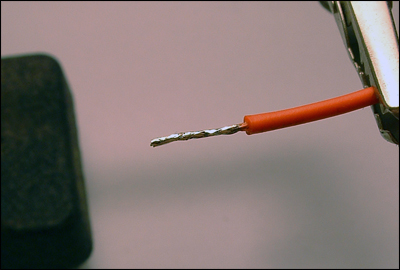
Now apply heat to the bare wire with your soldering-iron for just a second, and then touch the solder to the wire. The solder should melt and flow into the wire cleanly. This is the process known as “tinning”, and it is one of the key soldering habits to get into. Tinning your wires every time before soldering them to a component will make your soldering endeavors much more uniformly successful.
|
|
  |
|
|
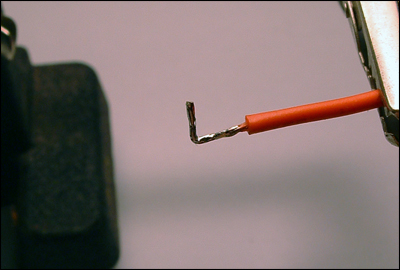
Once tinned, bend the wire into a 90-degree angle, as shown in the photo.
|
|
  |
|
|
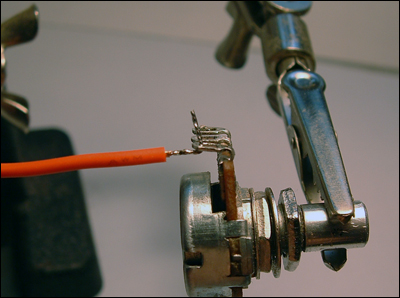
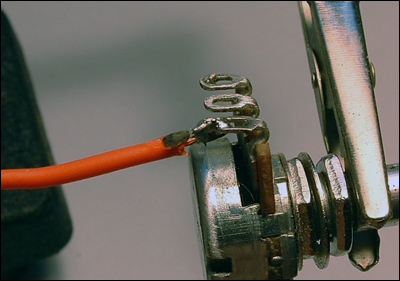
Once bent, insert the tinned end of the wire into the potentiometer lug.
|
|
  |
|
|
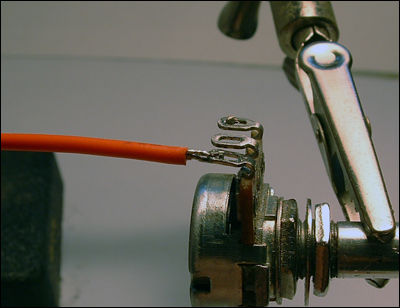
Lightly crimp the wire down, as shown. This is part of what we discussed before about joints being physically strong – whenever possible, take steps like this to add additional strength to your joints.
|
|
  |
|
|
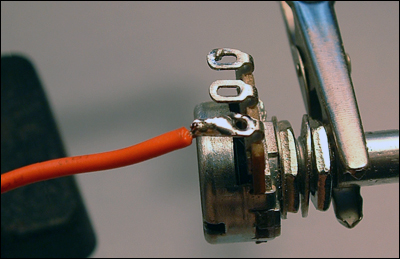
Now, apply the soldering iron to the lug and touch your solder to the junction area, for one or two seconds. The solder should quickly melt and flow smoothly into the joint of the wire and the lug. You should not end up with a misshapen blob of solder, just a clean, smooth joint. Also note that there is no reason for the hole in the lug to be completely full with solder – all you need is enough solder to firmly join the wire to the lug.
|
|
  |
|
|
Some builders like to add heat-shrink tubing to insulate the soldered lugs, to help reduce the chance of any short circuits. It is by no means required, but it can make your build look more professional, so it is worth considering. Sometimes those little touches make a big difference to a prospective buyer.
|
|
  |
|
|
SOME EXAMPLES OF HOW NOT TO DO IT
|
|
|
Burning the insulation with the soldering-iron might not affect the joint but it does look unsightly, and coats your iron in molten plastic. Just watch where you’re sticking that thing, OK?
|
|
  |
|
|
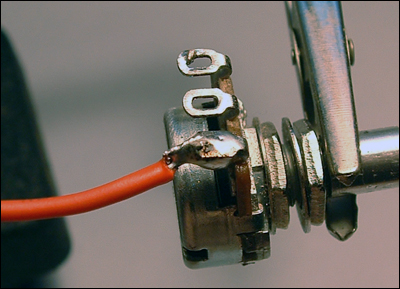
In this photo you can see that the lug has been completely filled with solder. There is no need for this, as mentioned above – all it does is waste solder, and apply unnecessary heat to the component.
|
|
  |
|
|
A common mistake is to just jam the wire ends into a lug without tinning the wire first. This almost always causes individual wire strands to be separated and to jut out, as shown in the photo. This can cause short circuits and other problems, and is really an awful habit to get into. Always make sure to tin your wires before insertion, and you will never have this problem.
|
|
 |
|
|
Just… UGH!
|
|
  |
|
|
SOLDERING WIRES TO THE BACK OF A POT
|
|
|
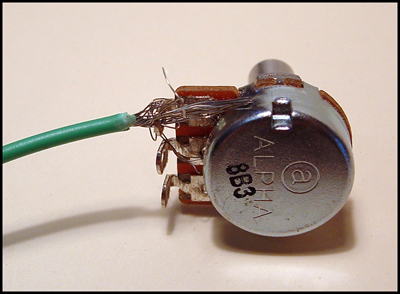
There are times when you need to solder a wire to the rear-casing of a potentiometer, to use as a ground wire. This can be a tricky task if not approached correctly, so it is worth discussing the method here.
|
|
|
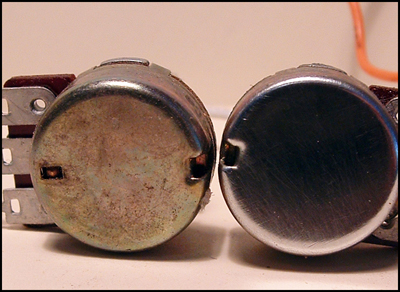
Many potentiometers have a protective coating on the casing, and they can also be greasy or dirty from the manufacturing process. It’s almost impossible to solder to a surface that’s not clean, so lightly sand the rear casing of the pot, or use steel-wool to take ensure the casing is a nice shiny metal surface. See the ‘before & after picture’ below for an example of this.
|
|
  |
|
|
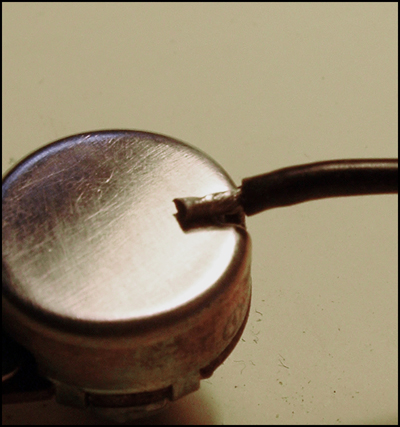
Now strip the insulation from the end of your wire, so that 1/4″ to 3/7″ of copper is exposed. Twist the strands together and tin the wire, as shown above. Then lay the tinned end of the wire flat against the pot-casing.
|
|
  |
|
|
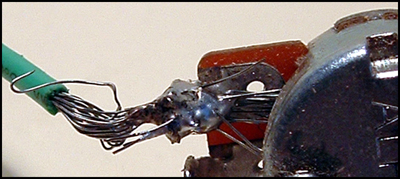
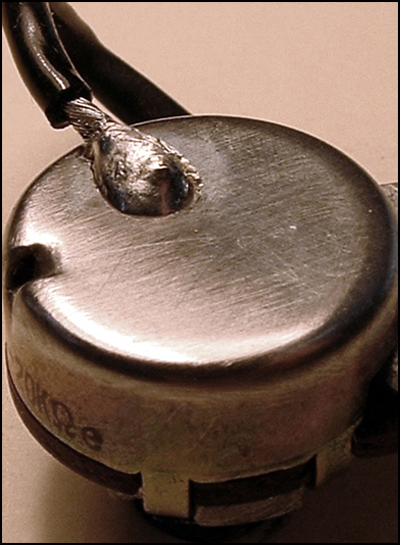
Touch the tip of your soldering-iron against both the wire and the pot-casing (to heat both parts equally). Apply a small amount of solder to the junction between the wire and the pot-casing. This whole heating/soldering process should not take more than 5 to 7 seconds. (This seems like a long time, but you need to heat the pot-casing sufficiently to allow the solder to flow). Your resulting solder joint should form the shape of a ‘limpet’.
|
|
  |
|
|
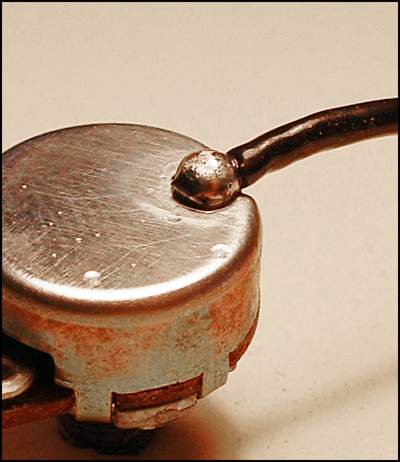
The blob of solder shown here is the result of not heating the pot-casing for long enough. While it initially seems ok, you will find, with a small tug, that it is merely the flux holding the joint together. This is not a good solder joint.
|
|
  |
|
|
|
|
SOLDERING WIRES TO A PIEZO TRANSDUCER
|
|
|
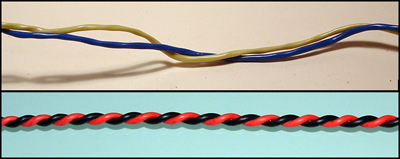
Wire-dressing is an important part of any soldering project. For something delicate like a piezo transducer, it’s a good idea to twist your wires together neatly before soldering. I have seen the piezo crystal pulled off the brass disc due to mishandling after soldering. A neat twist makes your wiring easier to use, easier to follow, and it’s easier on the eyes. You decide … |
|
  |
|
|
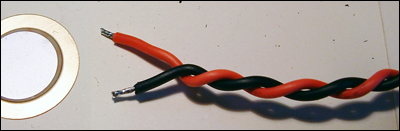
Strip 1/8″ to 3/16″ of insulation from the ends of each wire, twist the strands together and tin both wire-ends.
|
|
  |
|
|
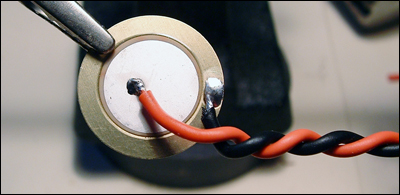
Lie the ends of the wire flat on the middle and outer parts of the piezo-transducer. It is good working-practice to always use black for your ground/earth wires
|
|
  |
|
|
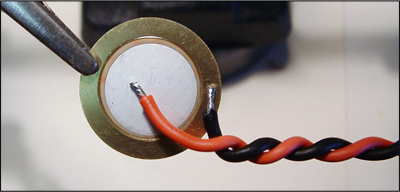
Touch the tip of your soldering-iron against both the wire and the piezo transducer surface (to heat both parts equally). Apply a small amount of solder to the junction between the wire and the piezo transducer. This whole heating/soldering process should not take more than 1½ to 2 seconds.
|
|
  |
|
|
Note: There is no need to apply a ‘blob’ of solder to either the wire, or the piezo-transducer, before soldering. If your wire is tinned, this will sufficiently transfer enough heat for soldering.
|
|
| written by Naz Nomad For a showcase of some of Naz’s creations, check out this link to his Flickr page. |
It does seem like something has gone wrong with the images. We will work on getting this article fixed. Thank you for pointing this out to us, Jeff!
Hmmm… the pictures at the end of the tutorial aren’t showing up. They have the “broken” icon. Maybe it’s just me. Tried it on two browsers and no luck…
Thanks for this very helpful post. As a beginner, I would add — be sure you have a decent soldering iron. I bought an off-brand iron that looked great and seemed like a bargain, but after fighting with it for a couple of hours and cursing myself for my inability to solder one decent joint, it finally dawned on me that at least part of the problem might be the soldering iron. So I went and bought a new 45 watt Weller for $20, and presto! What a difference. Tools Do make a difference. Lesson learned!