
The Zero Fret is an arcane subject to many cigar box guitar builders. I have to confess, for a long time they were a mystery to me too. Sure I had heard of them, seen pictures of people using them, and thought I understood most of the concept – but for some reason, I still always shied away from using one. That is, until Shane Speal finally beat it through my stubborn skull that we needed to start using them in the C. B. Gitty shop, and once we tried it we didn’t look back.
So this article is my effort to help everyone realize the benefits of using a zero fret setup on their cigar box guitar builds. It may not be for everyone, but my hope is that you’ll consider giving it a try. I’ll break this article down into three clear sections: What is a Zero Fret; Why to Use a Zero Fret; and How to Install a Zero Fret.
What is a Zero Fret?
Most simply stated, a zero fret is an extra piece of fretwire, usually a couple of sizes bigger than what you’re using on the rest of the fretboard, which gets installed up at the top of the fretboard where the nut would usually go.
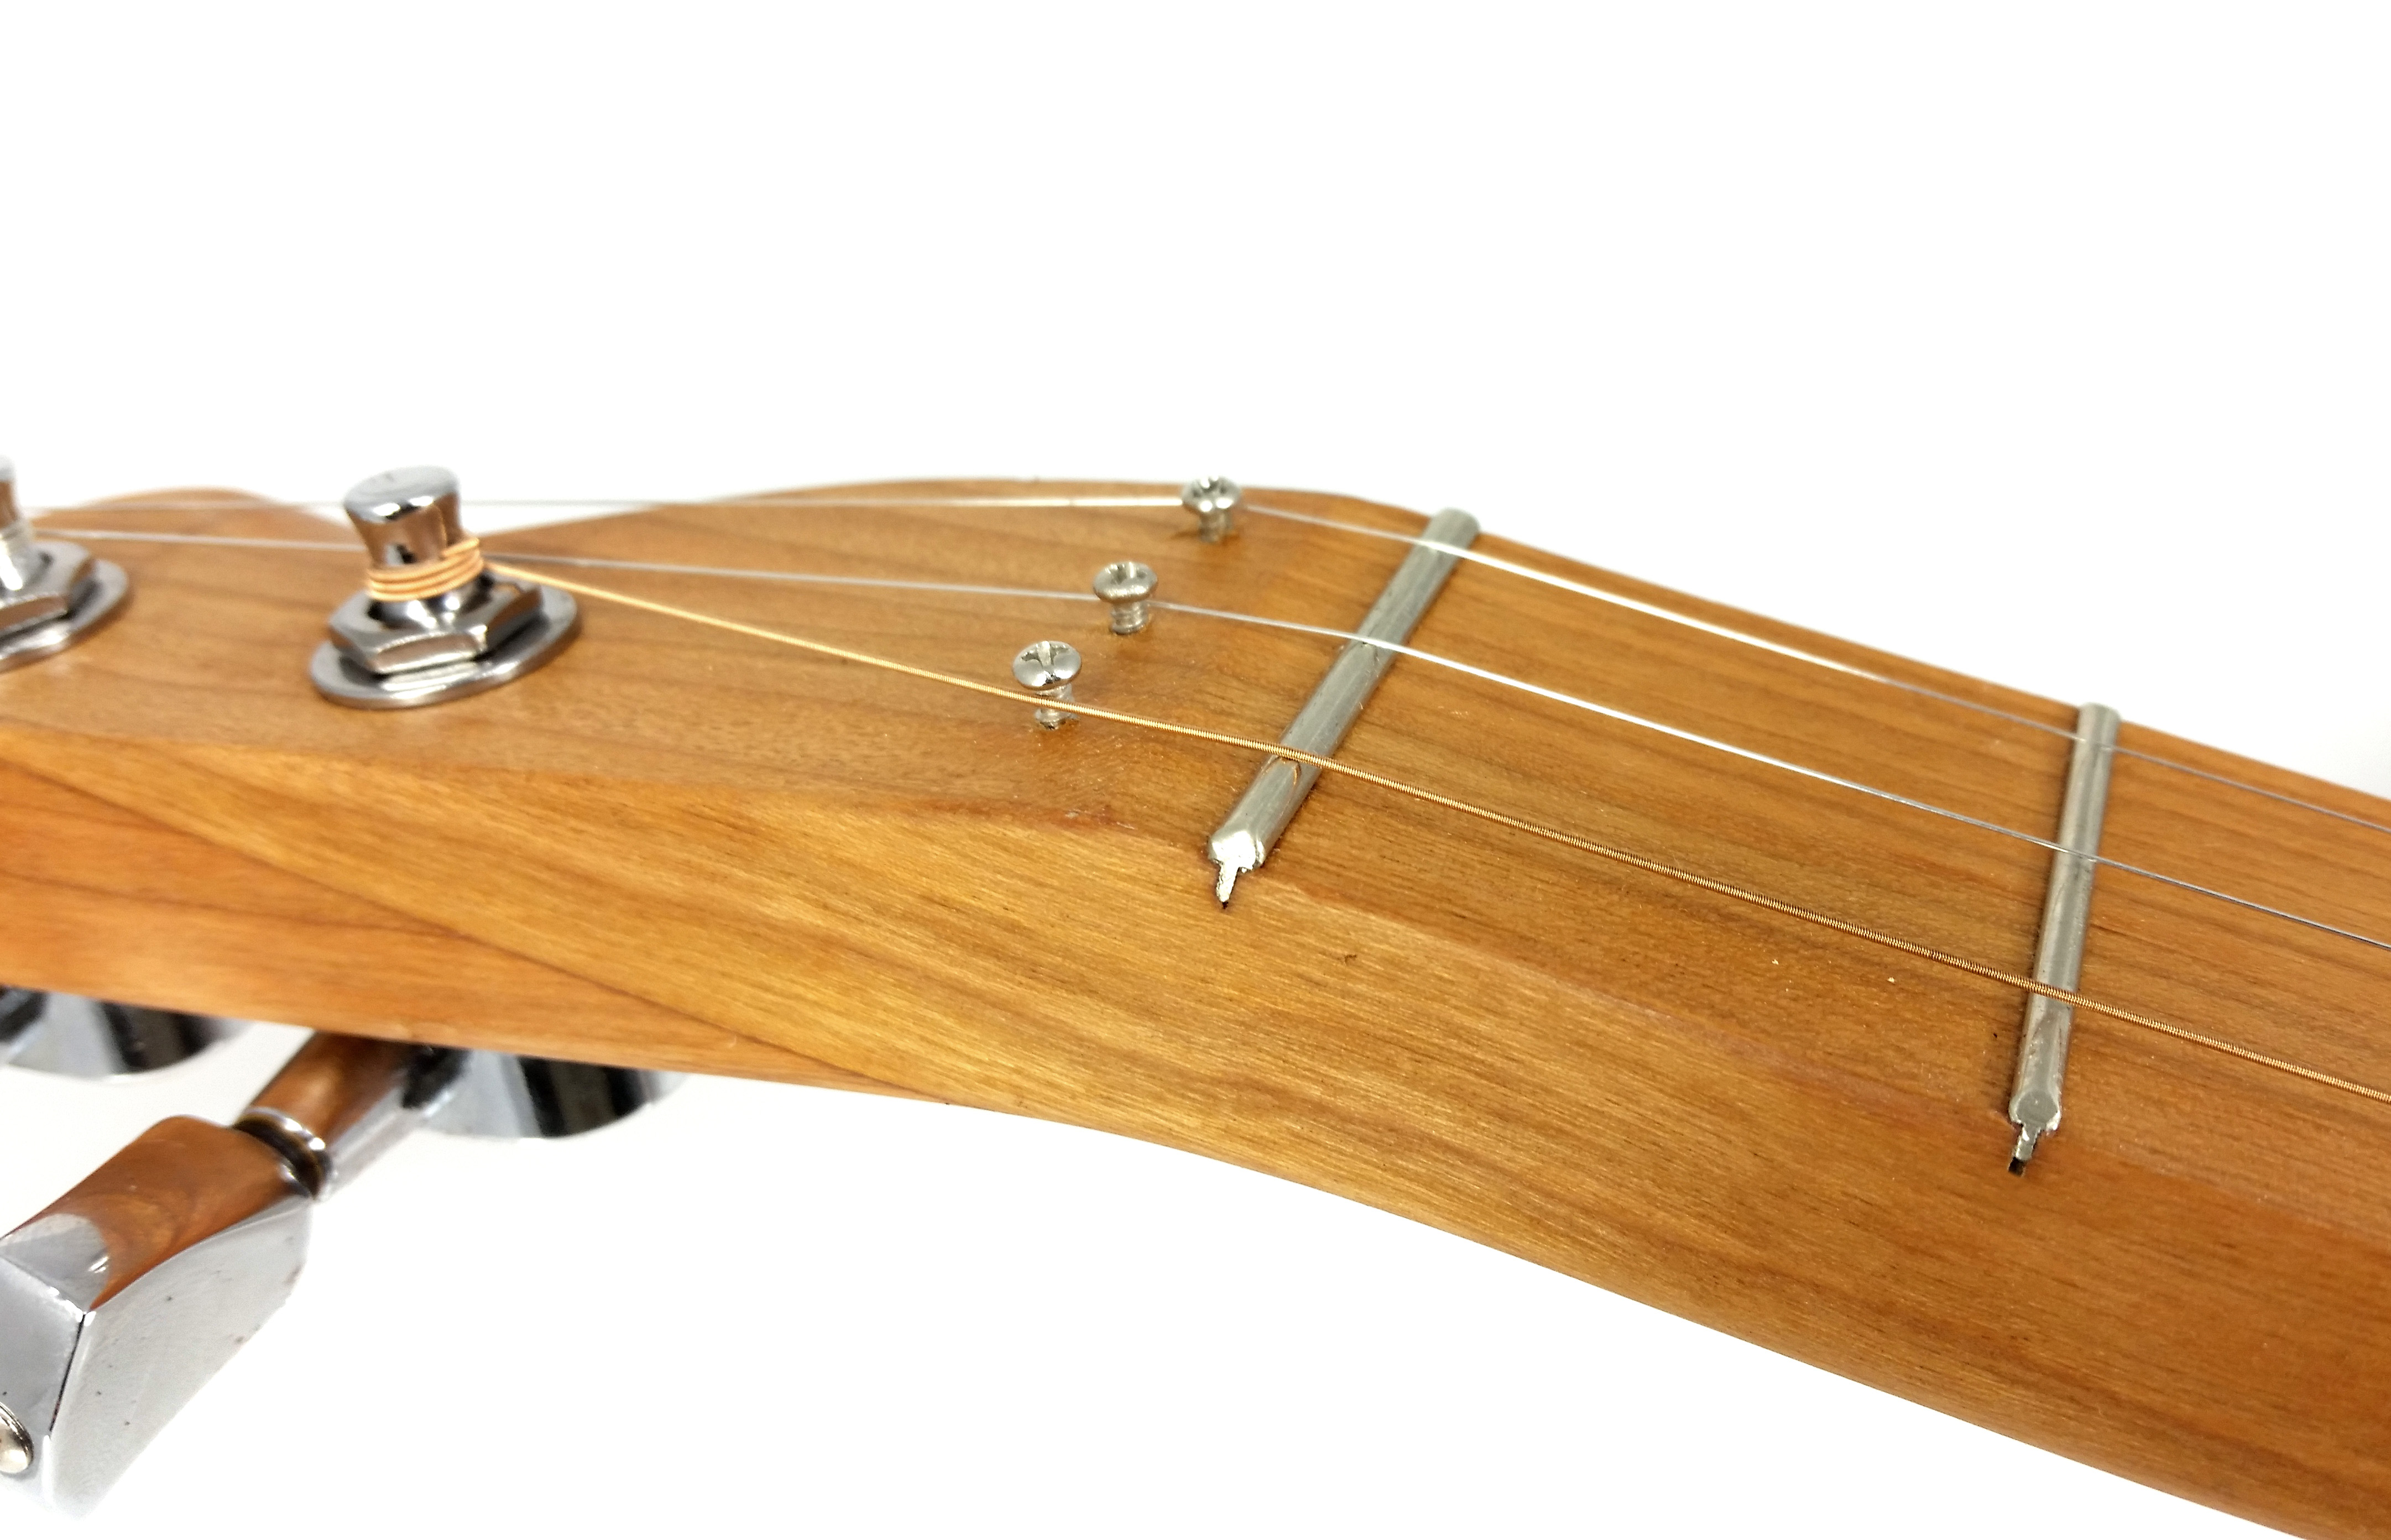
In our workshop, we usually use either our Medium/Medium nickel-silver fretwire or our Medium/High nickel-silver fretwire on the instruments we build. So for our zero frets, we will use a larger fretwire, most often our standard Jumbo nickel-silver. The jumbo wire’s crown is about 0.014″ higher than the Medium/Medium, and 0.012″ higher than the Medium/High, and we feel that this helps make sure that the action height work better and minimize buzzing in the strings. Other builders use the same size fret wire for the zero fret as they do for the rest of the frets. Check out the photo below.
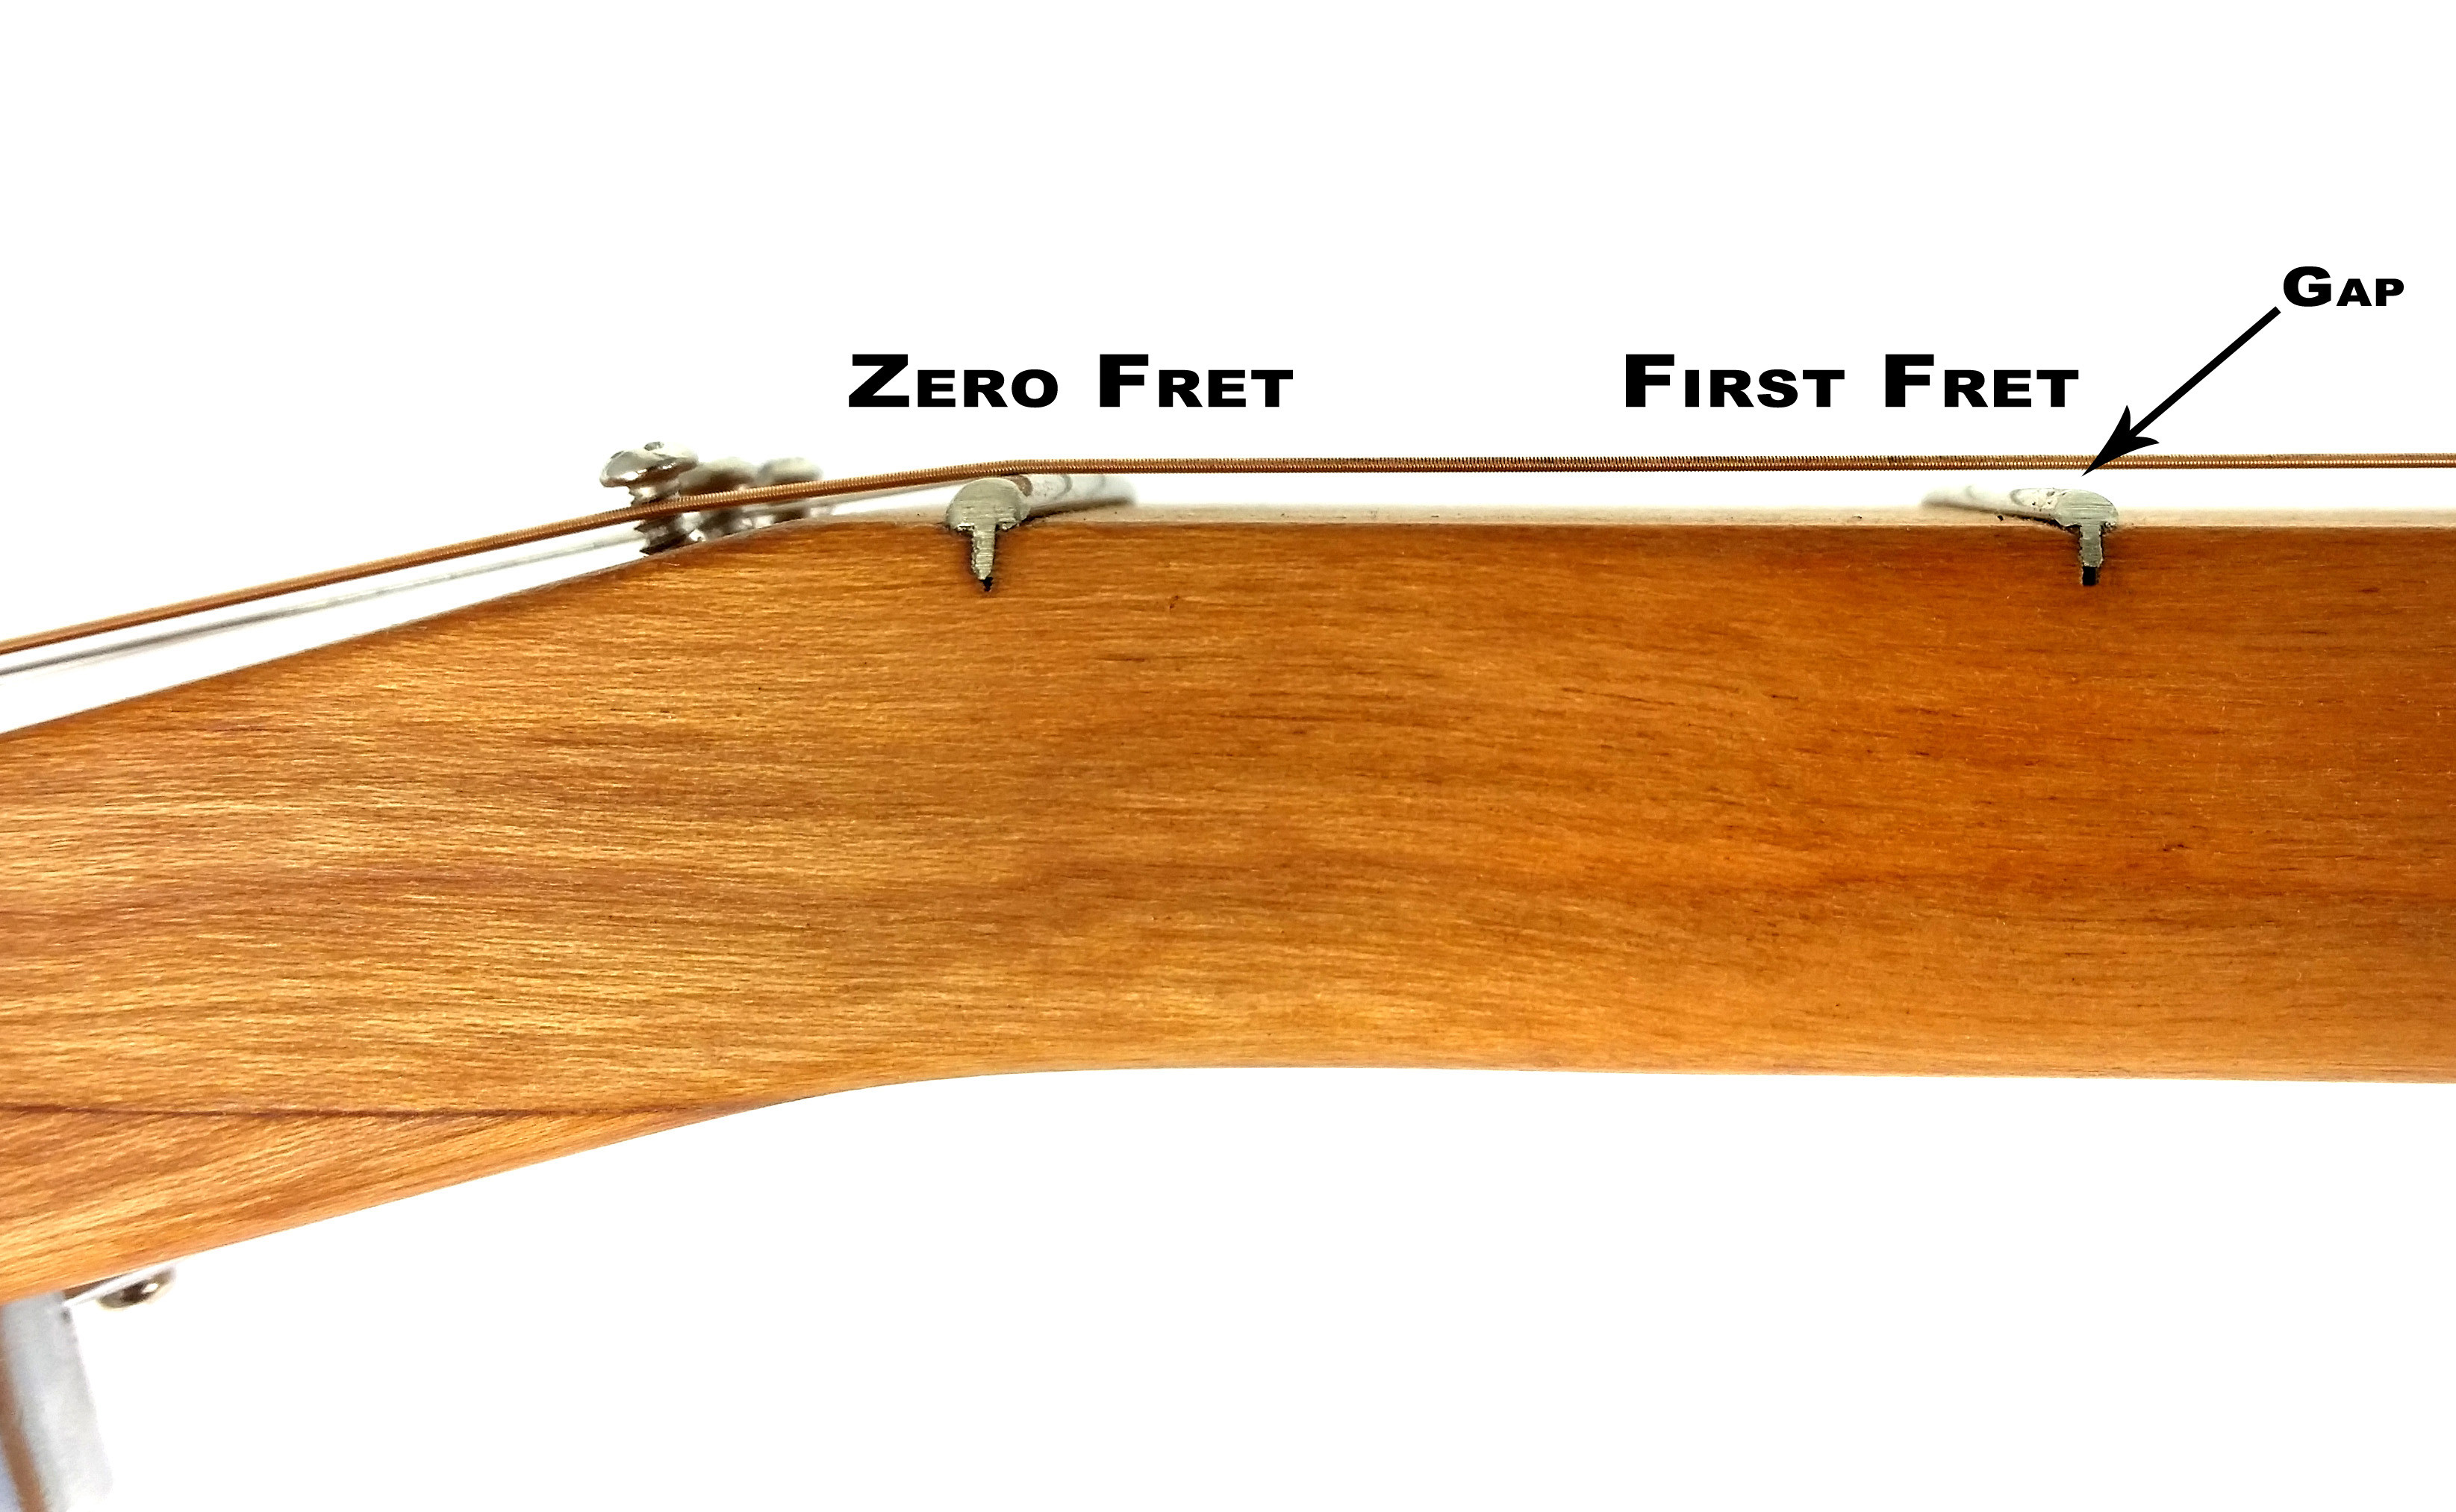
In the photo you can clearly see that the zero fret is a larger profile than the first fret (jumbo vs. medium), and you can also see the effect – a pronounced gap between the strings and the first fret. This gap is what is technically referred to as the “action” or “action height” of the guitar, and keeping it as low as possible is very important to having a well-made and easy-to-play cigar box guitar. As mentioned above, some builders prefer to use the same size of fret wire for the zero fret as they do on the rest of the fretboard – it’s not what we do, but there’s no question that it can work just as well. We advise trying both and seeing what works for you!
The other things you can see in the above photo are small screws that are used as string retainers, to make sure the strings stay in the right places , and at a good angle, as they cross over the zero fret. More on this below.
Why Use a Zero Fret?
As mentioned above, to build a fretted cigar box guitar that a professional musician will want to play, you have to pay very close attention to the “action height” – that is, the height of the strings off of the frets. You want it to be as low as possible, but not so low that you get buzzing or rattling from the strings when played.
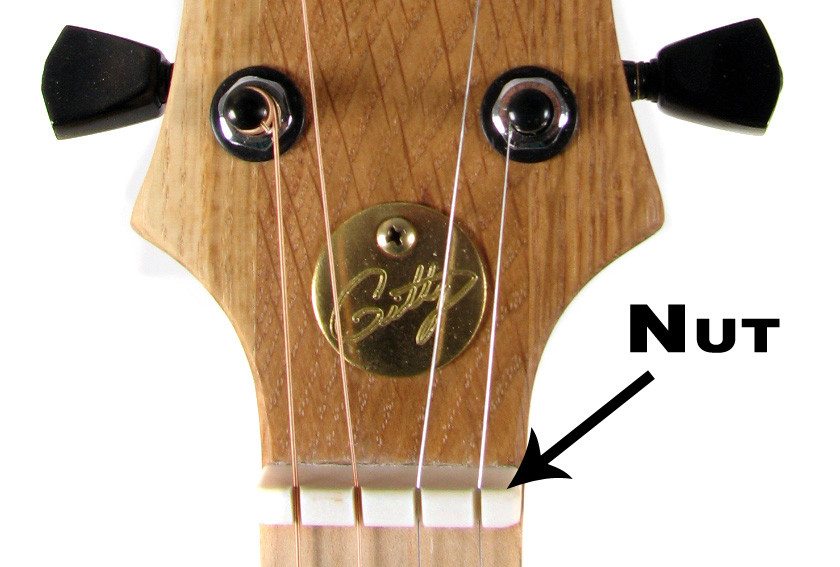
Traditionally, the job of determining the action height on a guitar is done by the nut. Most often on store-bought guitars, nuts are made from bone, but they can also be made from plastic, wood, metal or synthetic materials like Corian.
The nut is glued into place at the top of the fretboard, and filed/sanded down to the right height, and then grooves for the strings are filed in to help keep the strings in the right position. As such, the nut both sets the action height (the height of the strings off the frets), as well as setting the spacing and position of the strings across the fretboard.
The problem with a nut is that it takes some skill and finesse to get them shaped just right, and at the right height, and with the string grooves just so. Of course if you file it too far down, there’s no going back – you have to remove it and start over with a new one. It is just way too easy to end up with an instrument with high action, which is not very fun to play and may even intonate badly, when using nuts.
Enter the Zero Fret – when you use a zero fret, you are pretty much guaranteed that your action height will be pretty much perfect. A good rule of thumb concerning action height on a guitar is that the gap between the strings and the first fret should be about 0.80mm – which just happens to be the thickness of a standard medium guitar pick. If you use jumbo or even one of the higher-profile medium gauges as your zero fret, and one of the standard medium-height fret wires (around 0.040″ to 0.045″ crown height) as the rest of your frets, you will definitely be in this ballpark.
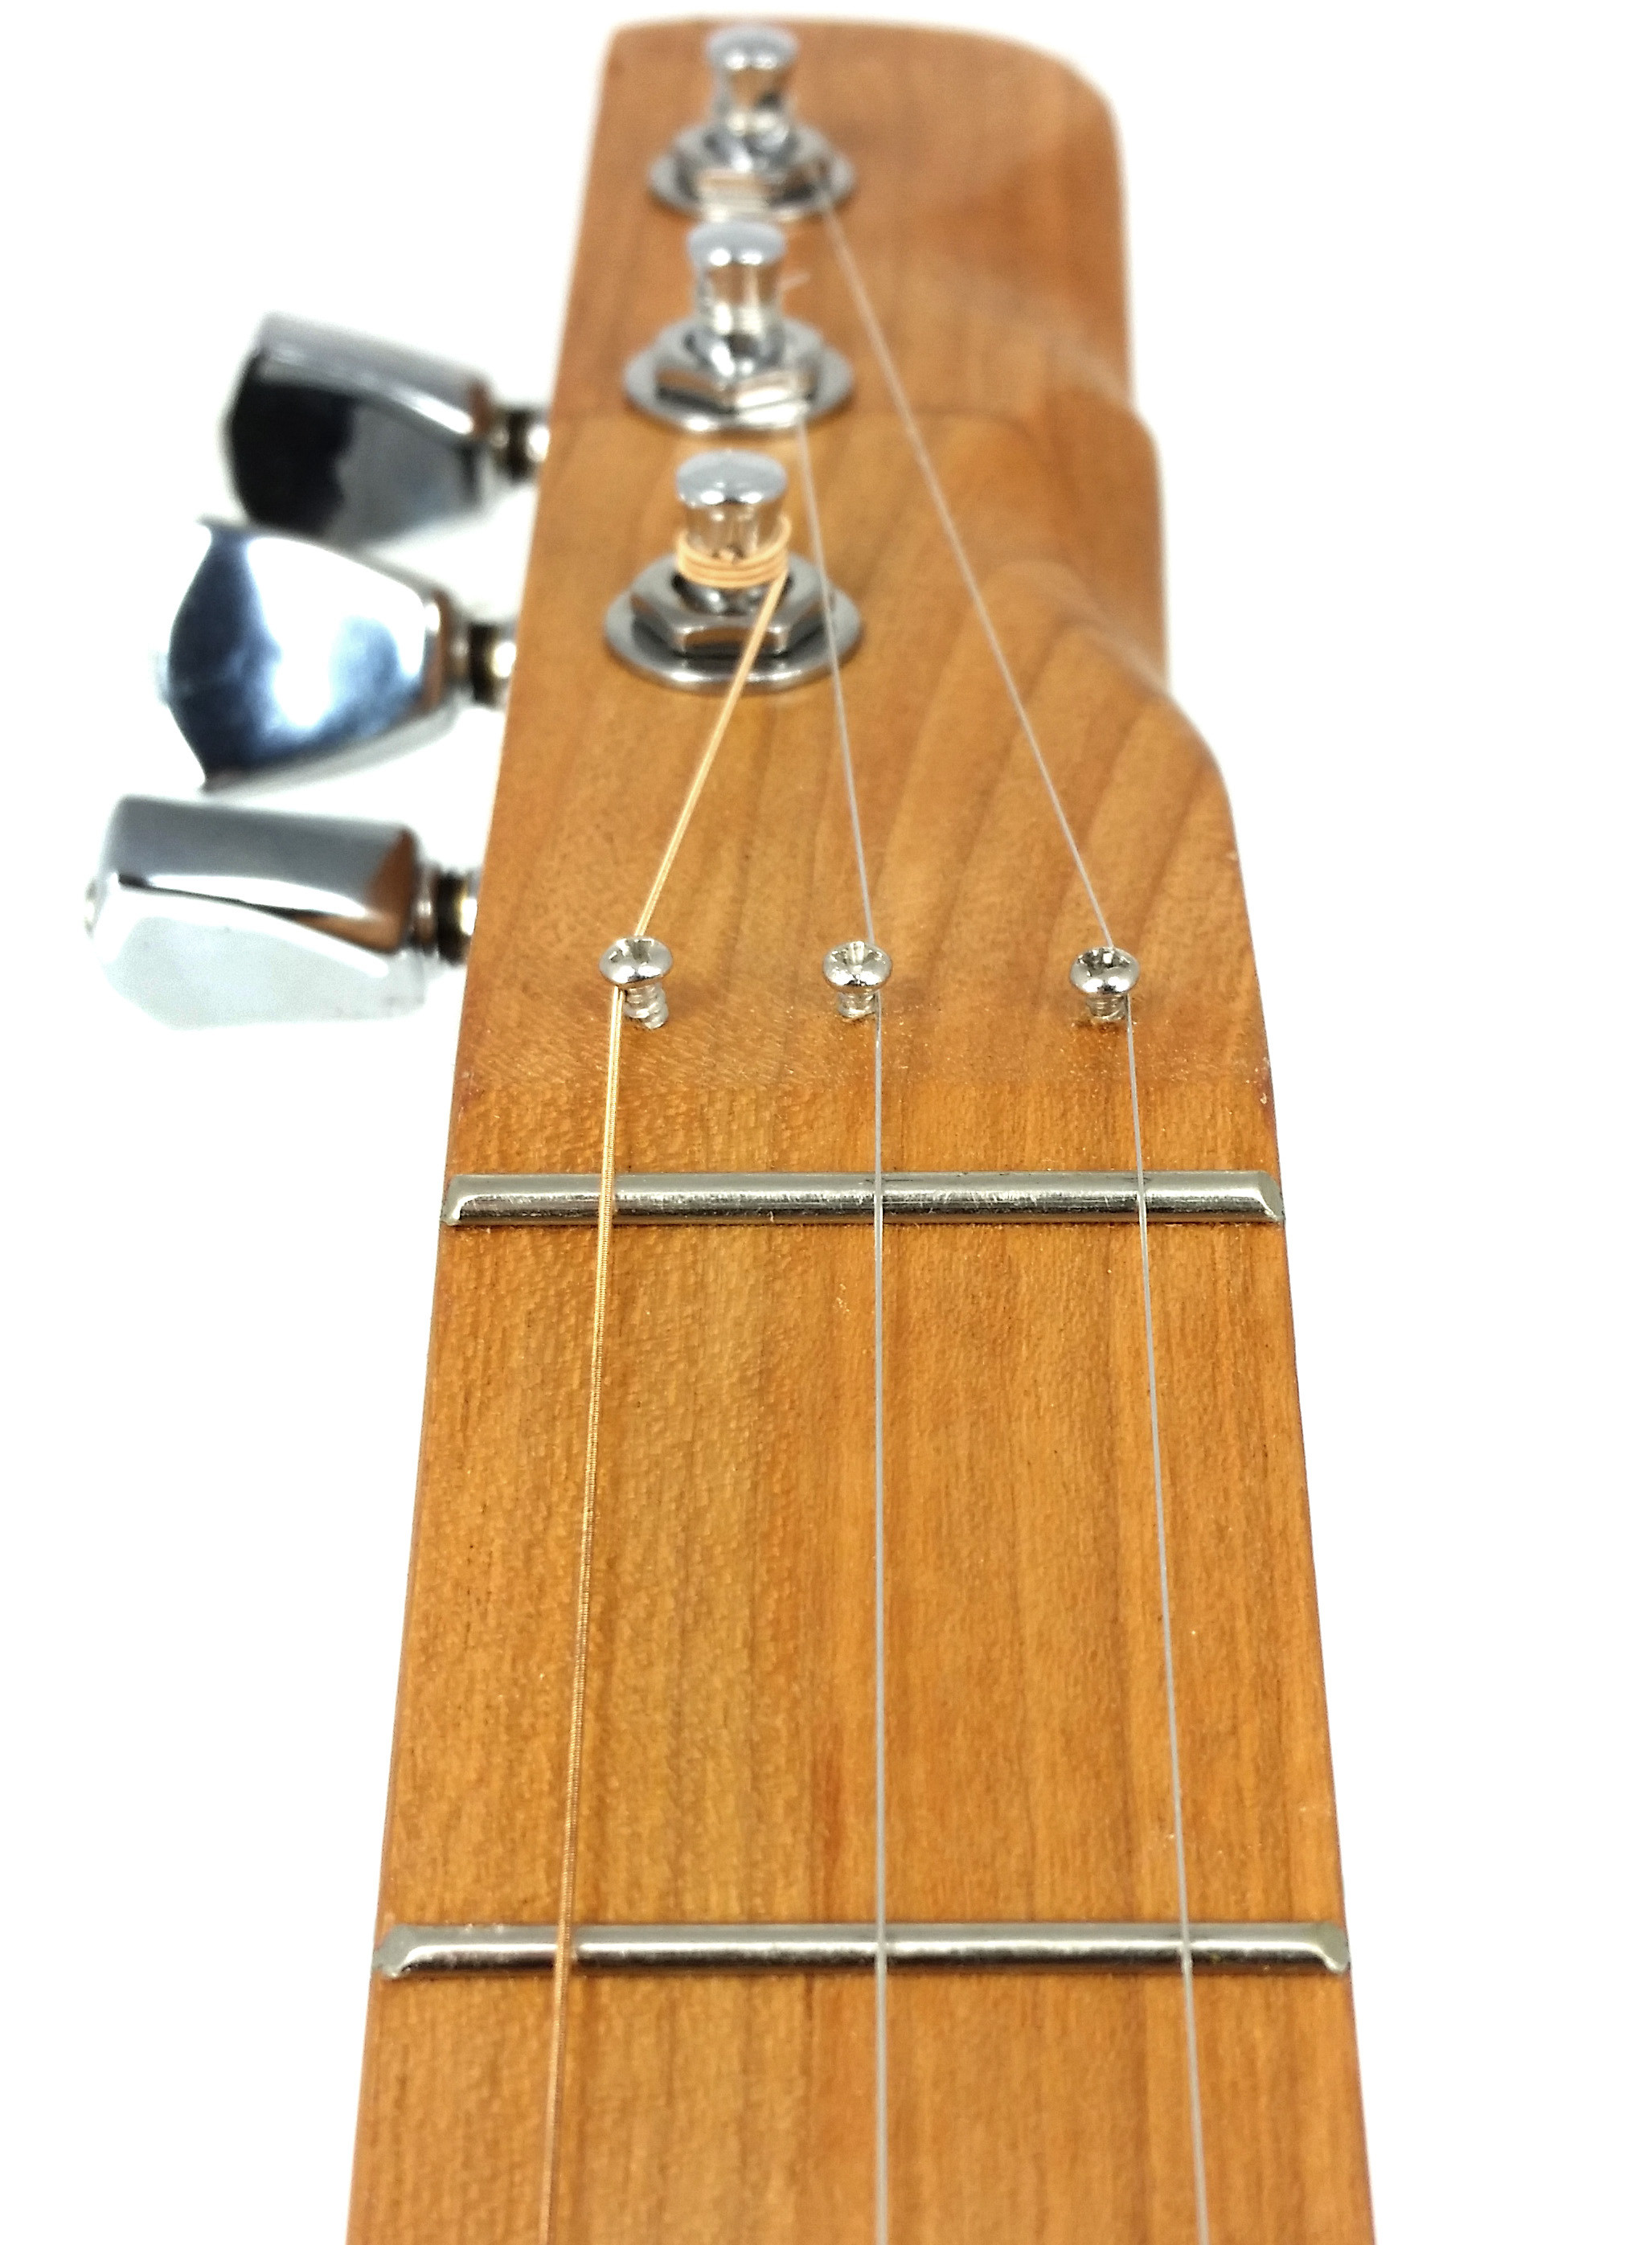
One caveat with a zero fret is that you do need to install some hardware to help keep the strings in place. Depending on your headstock design (angled verses recessed) this hardware might also need to serve the task of holding the strings down, so that they will have some “break angle” as they go up and over the zero fret. See the photo below for a visual of what break angle is.
There are various styles of string retainers that can be used for this, but on C. B. Gitty cigar box guitars we usually use small round-headed screws for this purpose (as shown in the photos above and to the right).
How to Install Your First Zero Fret
Assuming that you have read everything above, there shouldn’t be too much mystery left as to how you should go about installing your first zero fret on a cigar box guitar. Here is the outline of steps to follow:
- Get yourself some larger fret wire, such as our Jumbo profile.
- When cutting your fret slots, cut a slot exactly on the nut line (usually you wouldn’t cut this, when using a nut). The slot can be sawn with the same saw as the rest of them.
- Install one piece of the larger fret wire in the slot you cut at the nut line, and use the smaller fretwire for the rest of the frets.
- Smooth and dress the frets as you usually would, including the larger zero fret.
- When you get to the point of stringing your guitar, figure out where your strings will go, and where your string retainers/retaining screws should be placed. See the photos above for an idea of where we place them on a 3-string guitar. Remember that you want the retainer to both hold the string in the correct position in relation to the neck, as well as (if necessary) help hold the string down a bit so that it has to angle back up to cross the zero fret.
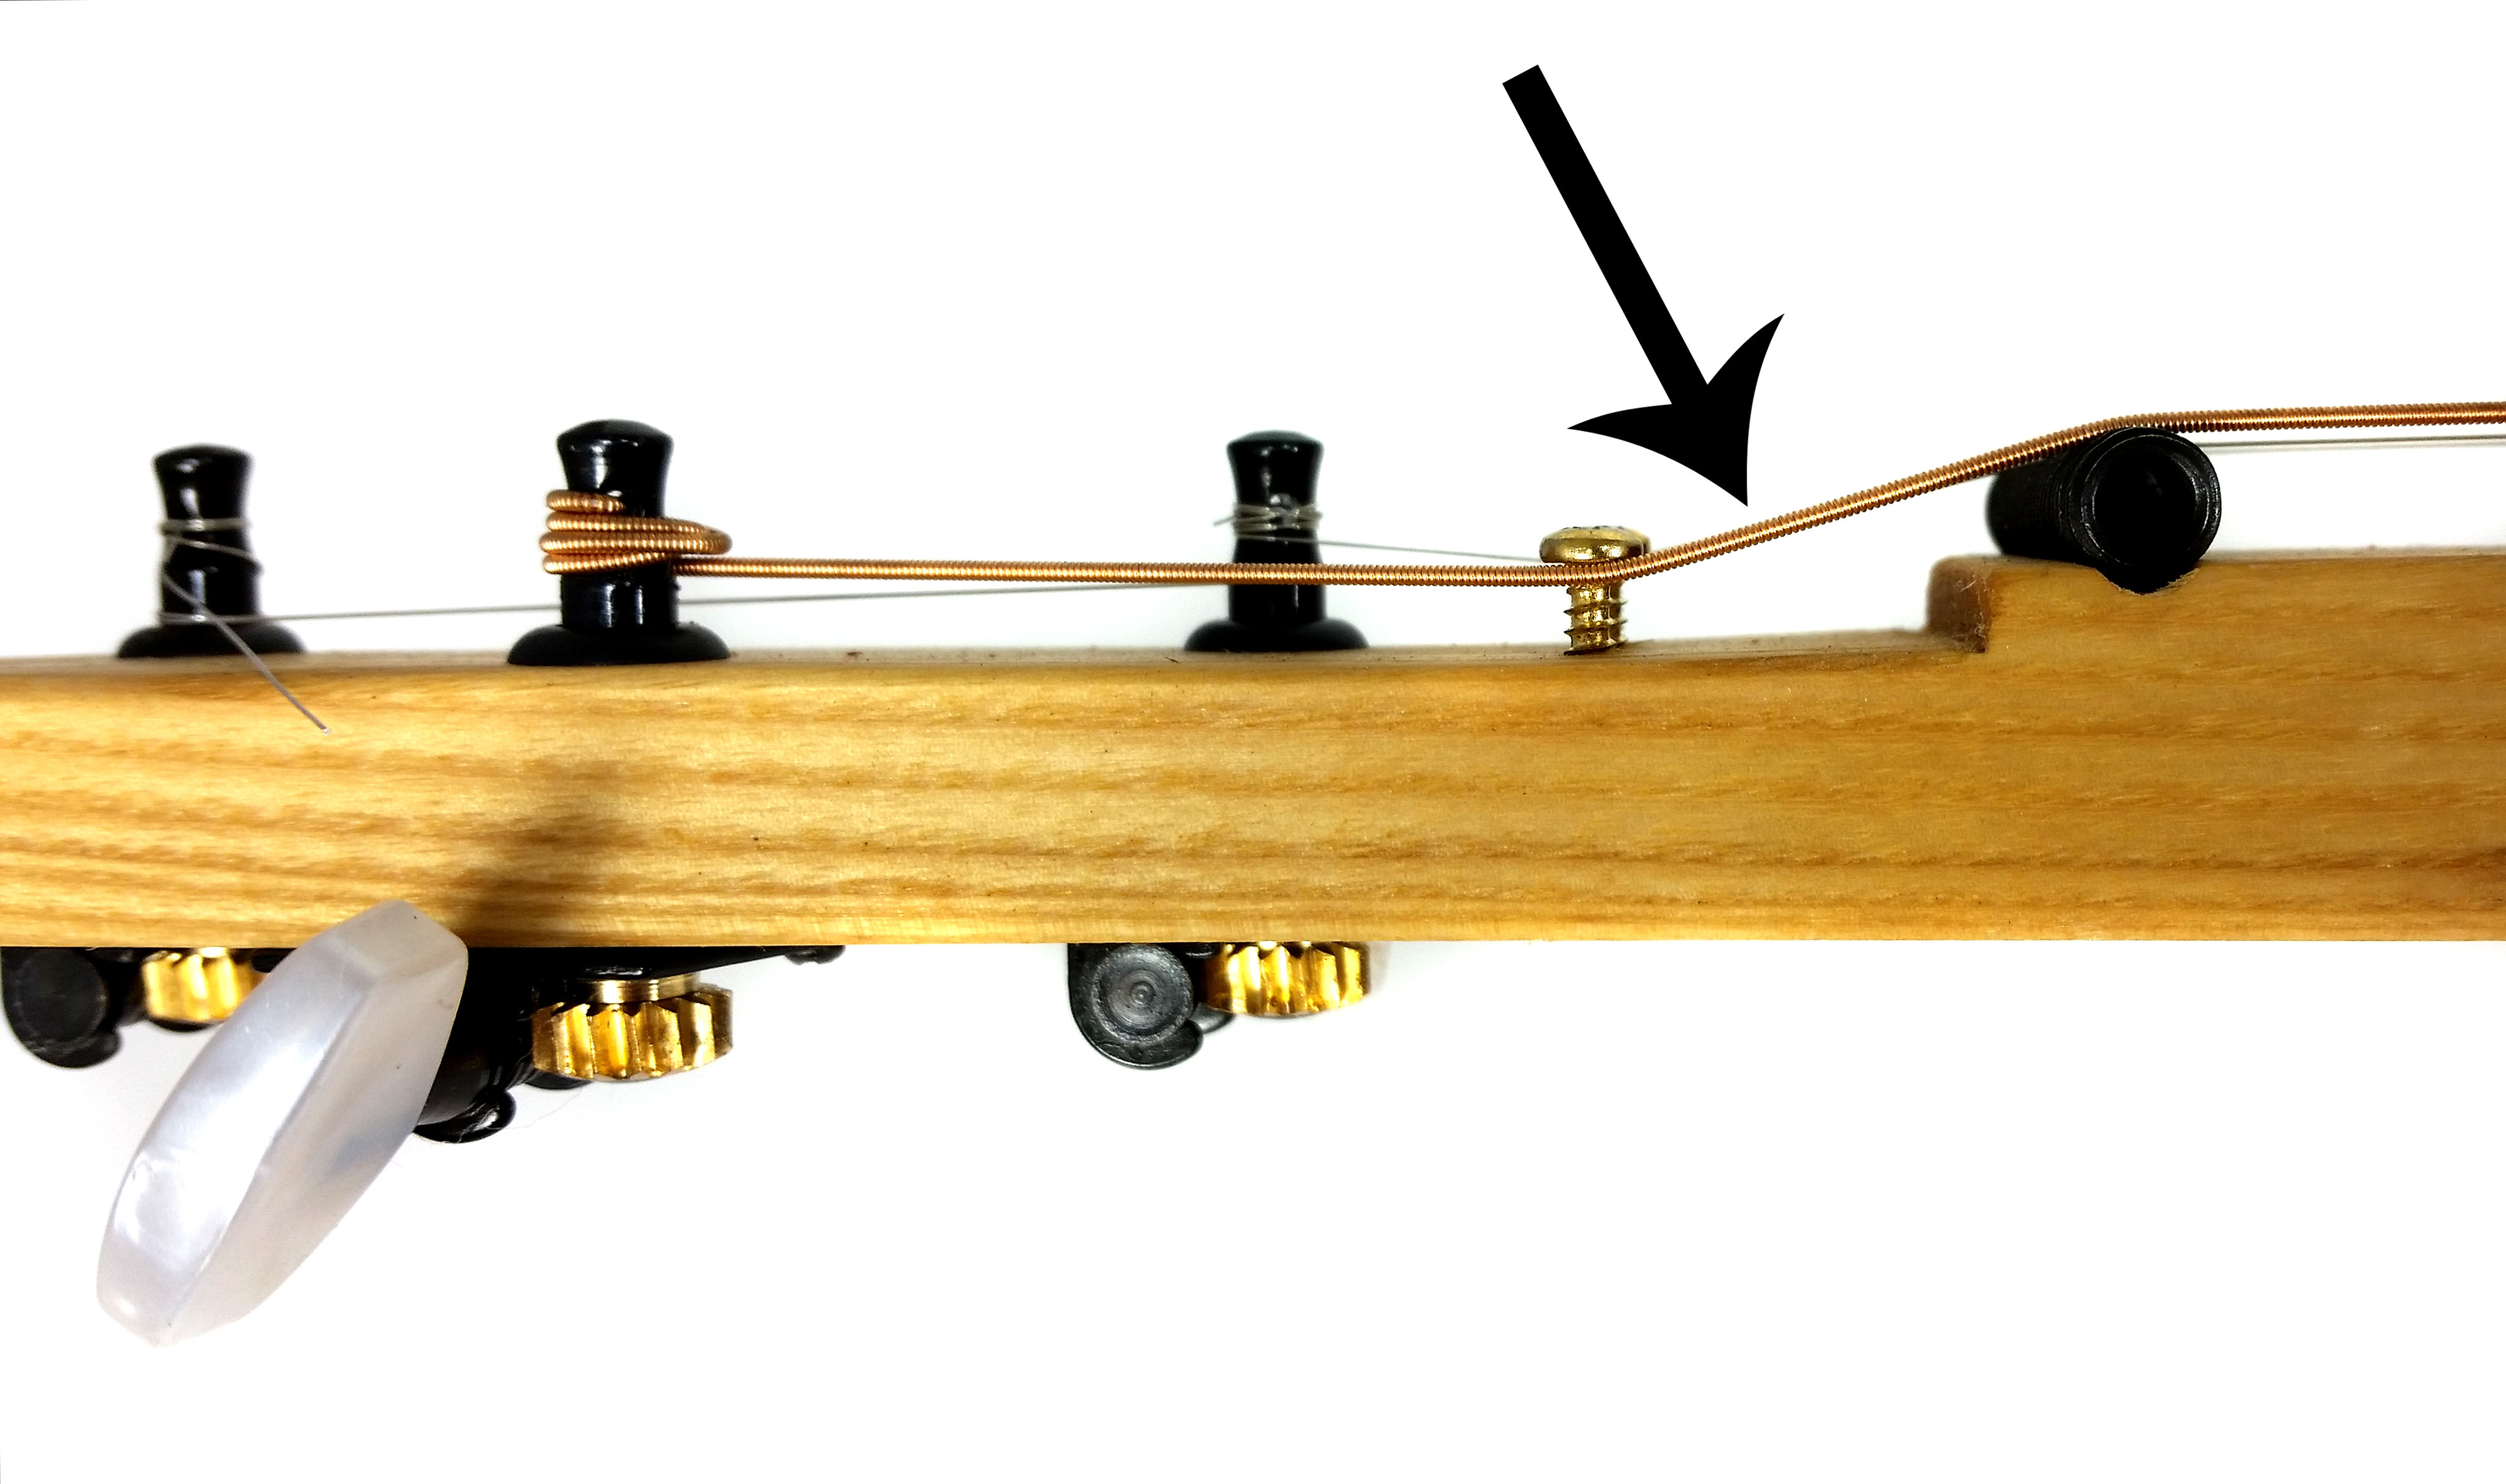
- The photo below helps show how retaining screws can be used on a cigar box guitar that has a recessed (instead of angled) headstock. The screws actually pull the strings downward from where they come off the tuner posts, so that they approach the nut (or zero fret) at a sharper angle. This photo happens to show an unfretted guitar with a threaded rod nut, but the principle is the same when using a zero fret. This sharper angle helps the guitar sound and intonate better (too low of an angle and the strings might buzz or vibrate).
You should now be able to string and tune your guitar, and your zero fret should be giving you pretty much optimal action height. The added step of having to use string retainers is a small price to pay compared to the hassle of installing and filing down a nut and getting it just right.
Zero frets, properly used, guarantee good string action height every time, and at least in the C. B. Gitty shops we have switched over to them for pretty much all of our Farmington Road Instrument Works cigar box guitars.
I hope that this article helps you better understand what a zero fret is, why you’d want to use them, and how to go about doing so. Please feel free to post comments or send questions, so that I can revise, expand and add to this article!